Lately I’ve been experimenting with listing domain names for sale from my GoDaddy account using Sedo, one of the domain industry’s largest marketplaces for buying and selling domains.
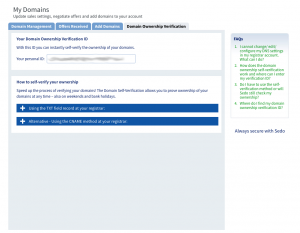
While adding my domains to their system for listing is quite trivial, I quickly encountered how cumbersome Sedo’s ownership verification process is for each domain.
Ownership verification is likely not a problem when only listing a handful of domains at one time. Simply add a DNS record for each domain at your domain registrar, and that’s it.
However, if you’re adding more than 5 domains to Sedo, then you’ll want to rethink how you go about Sedo’s ownership verification process.
Most people opt for bulk updating name servers for bulk domains entered into their Sedo account. But what about those of us that don’t care to change name server settings or don’t want to park our domains with Sedo?
Today’s tutorial will help address this very question by showcasing how to use GoDaddy’s API to update DNS records for a given domain with specified Type and Name.
By the end of this tutorial, my hope is that you’ll be able to create your own bulk update tool for Sedo ownership verification if your domains are managed by GoDaddy.
Getting Started with GoDaddy API
Before diving into the details, I won’t spend much time, if any at all, covering how to get started with GoDaddy’s API.
If you’re new to using GoDaddy’s Developer Portal and API, then I recommend reviewing the following resources:
- GoDaddy Developer Portal – Create Account
- GoDaddy API Credentials
- GoDaddy API Documentation
- Get Started Using GoDaddy API with PHP
Let’s get started!
Methods for Adding and Replacing GoDaddy DNS Records
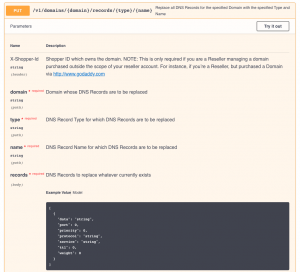
As displayed in the image below, a number of methods are shown for adding and replacing DNS Records for a given GoDaddy Domain using the API.
This tutorial focuses on the following method (as shown below in the image) for replacing all DNS records for the specified Domain with the specified Type and Name.
WebsiteHostingReview.org/wp-content/Screen-Shot-2019-07-10-at-1.48.14-PM-768×55.png 768w, https://WebsiteHostingReview.org/wp-content/Screen-Shot-2019-07-10-at-1.48.14-PM.png 1020w” sizes=”(max-width: 500px) 100vw, 500px”>
I chose this method due to Sedo’s ownership verification requiring that a TXT or CNAME record be created using a verification ID as provided by Sedo.
 WebsiteHostingReview.org/wp-content/Screen-Shot-2019-07-10-at-1.55.24-PM-768×597.png 768w, https://WebsiteHostingReview.org/wp-content/Screen-Shot-2019-07-10-at-1.55.24-PM.png 981w” sizes=”(max-width: 500px) 100vw, 500px”>
Today’s tutorial instructs you how to add a TXT, although you could easily change to CNAME too, record to a GoDaddy managed domain for Sedo to verify your ownership.
Setting up required and optional variables
Open a text editor, name and save the following file: dns-recorder.php.
The first action is to create a variable (i.e., $domains) containing an array (i.e., see examples below) of your GoDaddy domains listed at or soon to be listed at Sedo.
$domains = array(
“mckinneydigital.com”,”dallasdigital.com”,”austindigital.com”
);
If only one domain, then the code would be as follows:
$domains = array(
“mckinneydigital.com”
);
Next, create a foreach statement to iterate over each of the array values in the $domains variable. The foreach statement ensures that a DNS record is added to each domain instead of only the first domain.
foreach($domains as $domain){
//additional code here
}
Within the foreach statement, your GoDaddy API credentials must be defined as variables as well as the domain, and necessary DNS Record variables and their respective values.
It’s essential to add your respective API Key and Secret, or else this tutorial is dead in the water.
As for defining variables for DNS records, the following variables and their values should be defined:
$dns_domain – using PHP’s strtolower method, pass the $domain variable as its argument, which ensures all domains are lowercased.
$dns_type – set the value to TXT or CNAME; additional values are: Nameserver, A, MX, SRV, AAAA, CAA.
$dns_name – set the value to @.
$dns_data – set data value to your Sedo verification id.
$dns_port – set port value to 80 or 443.
$dns_priority – set priority value to 10 or an increment of 5.
$dns_protocol – set a protocol string value; set to ’string’ for this tutorial as its not required.
$dns_service – set a service string value; set to ’string’ for this tutorial as its not required.
$dns_ttl – set til value to be 600 or any one of the following: 1/2 hour, 1 Hour, 12 hours, 1 Day, 1 Week, Custom.
$dns_weight – set this value to 10 or an increment of 5.
With aforementioned variables defined and values set, define and set the value of one last variable: $dns_records.
The $dns_records variable contains the last seven variables as a json object or string (see below).
$dns_records = “[{”data”: ”$dns_data”,”port”: $dns_port,”priority”: $dns_priority,”protocol”: ”$dns_protocol”,”service”: ”$dns_service”,”ttl”: $dns_ttl,”weight”: $dns_weight}]”;
Making the call to add DNS Record
With necessary variables and values set, we’re now ready to instantiate the GoDaddy API call to add the DNS record using a user-defined function named addDNSRecord.
Define a variable named results and set it equal to addDNSRecord. This addDNSRecord function does the heavy lifting to make the GoDaddy API call based on passing the following four variables passed as arguments in their respective order: $dns_domain, $dns_type, $dns_name, and $dns_record.
$results = addDNSRecord($dns_domain, $dns_type, $dns_name, $dns_records);
Error checking the addDNSRecord function
The final step of this tutorial is adding a bit of error checking. While you can choose to dive deeper in providing greater detail, I’ve chose to display a simple pass or fail text message based on whether or not the results variable returns a value.
if(!$results){
echo “All good in hollywood for the following domain: $dns_domain
“;
} else {
echo “Houston, we have a problem with the following domain: $dns_domain!”;
}
If a value is returned when the API call is made, then the success message is displayed and reads as follows:
All good in hollywood for the following domain:
If API call is made in error, then the fail message is displayed and reads as follows:
Houston, we have a problem with the following domain:
If API call is successful, then you should be able to view the newly added DNS record containing Sedo verification id for your respective domain(s) in GoDaddy’s Domain Manager.
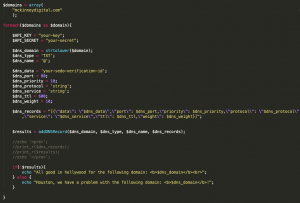
When putting the code together in its entirety, not including the functions section for addDNSRecord, there are roughly 40 lines of code.
 WebsiteHostingReview.org/wp-content/Screen-Shot-2019-07-23-at-12.22.24-PM-768×521.png 768w, https://WebsiteHostingReview.org/wp-content/Screen-Shot-2019-07-23-at-12.22.24-PM.png 886w” sizes=”(max-width: 500px) 100vw, 500px”>
And that’s all there is to this tutorial.
addDNSRecord function
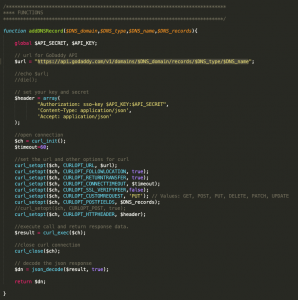
The addDNSRecord function is the sole function executing the heavy lifting to add DNS records to a given domain.
 WebsiteHostingReview.org/wp-content/Screen-Shot-2019-07-23-at-12.19.44-PM-150×150.png 150w, https://WebsiteHostingReview.org/wp-content/Screen-Shot-2019-07-23-at-12.19.44-PM.png 730w” sizes=”(max-width: 500px) 100vw, 500px”>
One thing to note is the following GoDaddy API url used:
https://api.godaddy.com/v1/domains/$DNS_domain/records/$DNS_type/$DNS_name
 WebsiteHostingReview.org/wp-content/Screen-Shot-2019-07-23-at-12.07.47-PM-768×696.png 768w, https://WebsiteHostingReview.org/wp-content/Screen-Shot-2019-07-23-at-12.07.47-PM.png 1009w” sizes=”(max-width: 500px) 100vw, 500px”>
In addition, this tutorial uses the PUT request method unlike previous tutorials that have used GET and POST request methods.
You can likely use this function in the future and simply make minor modifications to url value and request type variables.
Closing thoughts
I encourage you to download the tutorial code, make necessary modifications, and see where this tool takes you.
DOWNLOAD dns-recorder.zip for GoDaddy Domains API
This tutorial can easily be modified to add a simple HTML form interface likely using Bootstrap or basic HTML5.
Please don’t hesitate to leave comments should you have questions or encounter technical challenges implementing tutorial.
Thanks and that’s all for now!
© WebsiteHostingReview.org 2019. This is copyrighted content. Website Hosting Review full-text RSS feeds are made available for personal use only, and may not be published on any site without permission. If you see this message on a website, contact copyright (at) WebsiteHostingReview.org. Latest domain news at WHR.NEWS: Website Hosting Review.
The post Tutorial: How to update DNS Records using GoDaddy API appeared first on Website Hosting Review.


